The camisole is not behaving

As mentioned previously, I wanted to make the “easy camisole.” This has turned out to be not so easy. None of my gauge swatches were similar to the gauge the pattern requires. The hem is of a type not normally done on the Passap (or maybe just generally not with dual bed machines).

Since none of my gauge swatches even came close to matching what the pattern calls for, I thought I’d just use the fabric I liked best. The pattern provides measurements on a diagram for each section, but these do not seem to add up to the final garment length. With the measurements appearing to be inaccurate, I can’t calculate how many rows I’ll need per section. So entirely choosing my own fabric is out – at least at this point.

Then I decided I’d rework the pattern for a tubular cast on – then I wouldn’t need to do the fold up bit for the hem. At first glance, all I thought I’d need to do was adjust the row counts used in the pattern to account for not doing the hem the same way. Which really is all I need to do, as I looked at this again in order to write an accurate post here, and figured out my row-counting-issues (I think).

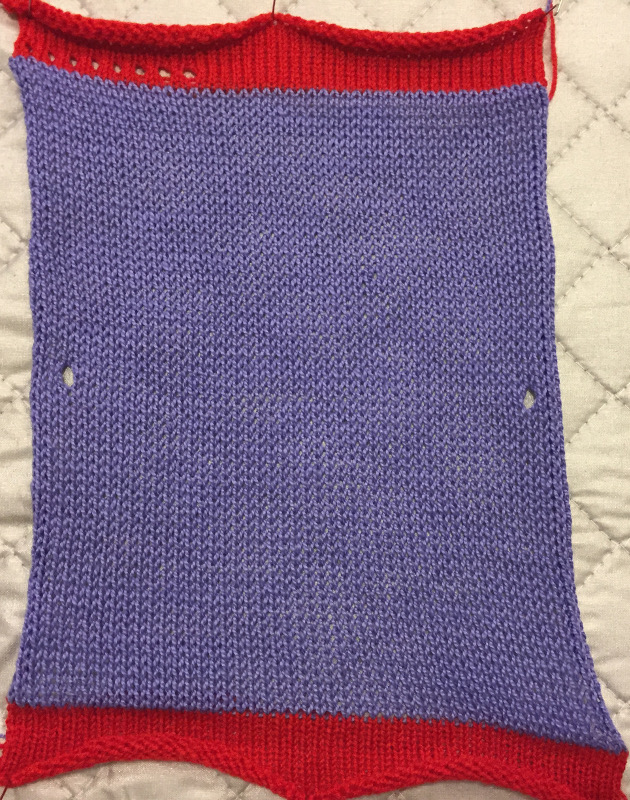
At this point, I was rather frustrated. I reviewed the measurements from my swatches and decided I’d pick the one with the closest match on rows. The width measurements given on the pattern’s diagram look to be correct. I also figured that I might as well attempt the folded up hem used in the pattern. I figured I’d be good from here on out.

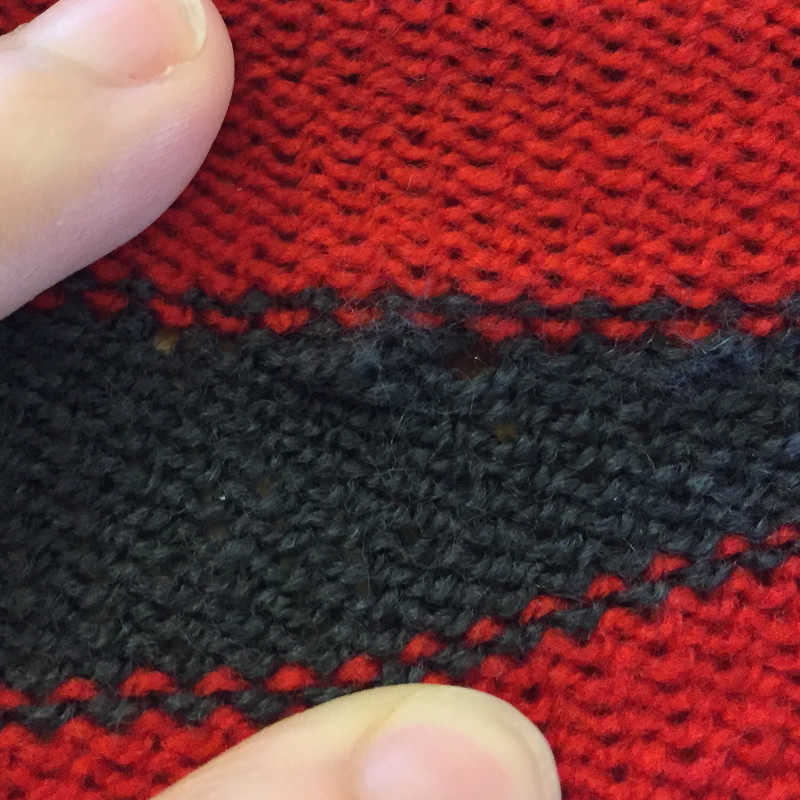
No, of course not. It couldn’t be that easy. The single bed cast on with the acrylic waste yarn goes okay (using the lazy/ugly method – every other needle in working position, knit one row, all needles in work, knit one row), but beyond that… not a chance. Stitches are refusing to knit and not just one here or there, but anything from one to twenty in a row. I really can’t figure out what’s going on. Even if I fix the missed stitches in the first row after cast on, it happens again the next row. And the next. And the next. If I can get enough length to use weights, that seems to help, but only for the stitches that are directly weighted. Anything in between the weights, those don’t like to knit (and with 124 stitches cast on, there’s quite a few in between). I have wiped down and oiled the machine, but to no avail.

I’m not sure where to go from here. Maybe since I think I’ve got the row count adjustments for a tubular cast on and hem figured out, I should attempt it that way.

I’m very curious about using waste yarn and ravel cord when doing a tubular cast on. Not quite sure that it works, or if there’s even a case where this makes sense. Will have to think about this some more.

Posted in Duo80 | Leave a comment

Test piece 6 and gauge swatches

I completed all of the jersey knit gauge swatch panels I want to do for the Valley Cotton 5/2, stitch sizes 5 to 8. At which point I realized that I had no T-pins for blocking them, and the severity of the curl was going to require pinning them. I also bought an ironing mat, since storing a full size ironing board in the apartment is kind of a pain.

Gauge Swatch, Stitch Size 8

I pinned this back out after I was done steaming, ironing, pinning, and measuring all of the swatch panels, just so I could take a picture of it. As soon as I turned my attention away to write this up, one of the cats was camping out on it.

I quite like the hand of the fabric at this gauge (about 6.67 stitches and 7.164 rows per inch), though it might be a bit see-through for some. I’m definitely going to need to figure out something to make that uses this. A summery sweater, probably worn with a tank top under, would look very nice.

My blocking/pinning surface is our coffee table with a cork-topped yoga mat on it and the ironing mat. I bought foam floor mats from Home Depot at some point for doing this, but I have no idea where they are at the moment. The yoga mat isn’t really as thick as I’d like, but we’re not too concerned about the veneer on the coffee table staying scratch-free (thank you, kitties).

I’m still figuring out a useful/sensible way to include gauge swatch information on here, but here’s a chart with my results for now (40 stitches by 60 rows):

Stitch Size Width (in.) Height (in.)
8 6.000 8.375
7 ¾ 5.875 8.000
7 ½ 5.750 7.500
7 ¼ 5.750 7.125
7 5.625 7.000
6 ¾ 5.500 6.750
6 ½ 5.375 6.500
6 ¼ 5.250 6.250
6 5.250 5.875
5 ¾ 5.250 5.375
5 ½ 5.125 5.250
5 ¼ 5.125 5.000
5 5.000 4.875

While I was waiting for the pins and ironing mat to arrive, I decided to attempt the sixth, and last, test piece in the Passap manual (see the two pictures below). It was an interesting piece to knit, lots of variety (obviously). Some of the pattern techniques really seemed to put stress on the machine, and I was concerned about damaging the needles or the locks or something.

Test Piece 6, front(?) side

Test Piece 6, back(?) side

One of the things I find interesting about this test piece is that the “front” side of each section aren’t all on the same side. For example, the two sections on the right appear to be facing front in the upper picture. However, the section second to the left seems to be facing front in the lower picture (and the two right-most sections seem to be the back side).

The second section from left (red) is called a honeycomb pattern by the manual, and the fourth section from left (black) is called a double honeycomb pattern. I’m not really sure I see all that much of a relationship between the two in their outcome. The way the pushers are set up, the names make sense. The red section also looks like a honeycomb pattern. Maybe I just don’t know what a double honeycomb pattern is supposed to look like.

Test Piece Close Up

The solid black and solid red sections, fourth and fifth from left, I’m not entirely sure came out correctly. The bumps and stuff are just… really weird. To the left is a thumbnail of some close-up pictures of these sections, both “front” and “back.”

Posted in Duo80 | Leave a comment

Gauge Swatches

I can see all my hand knitting people cringing or quietly shuffling away… I’m working on knitting up gauge swatches, both just as practice in machine knitting, practice in making the swatches, and in preparation for actually making something! I’m excited about feeling comfortable enough with the Duo80 that taking on a real project doesn’t seem (too) daunting.

I’m not real keen on the charts that Passap has in the manual for doing gauge swatches – they seem like they’re only meant for helping you make sweaters. Instead, I used the method that I learned from one of Susan Guagliumi‘s machine knitting classes. However, I’ve never been able to actually remember what that method was or manage to keep my notes from her class accessible, so I was very much glad to find it in her blog, Swatching for Success!.

The pattern I’m aiming to do is “easy camisole” from Clearwater Knits. Since I have no idea how the tension/stitch size translates from the Japanese-style machine that the pattern was done for, nor am I using the same yarn, I’m running through and just doing a bunch of swatches. I’m using Valley Cotton 5/2 in “blue iris.” Tonight I completed one panel of gauge swatches for the stitch sizes 5, 5.25, 5.5, 5.75 (which are normally written using fractions, but I think this is easier to read). I still need to wash/dry the swatch panel and measure it, but that can wait until the morning.

Now, this being cotton, it just does not have the stretch that acrylic or wool does (I’ve been doing the Passap test pieces in acrylic). It was causing me all sorts trouble – well, really, just refusing to properly knit. I finally noticed that the cotton was sort of creeping/curling up, which was making it difficult for the lock to knit the stitches properly. Solution: weights. I don’t care that the Passap machines “don’t need” weights because of the strippers, but they’re also not supposed to need cast on combs – yet they exist!

We went on a couple of excursions over the weekend. This weekend (3 and 4 June) and next weekend (9 and 10 June) is the American Crafts Festival at Lincoln Center. A lot of really pretty jewelry and adorable baby clothes and a bunch of other stuff there, but we went to talk to Tess and Temple of Crowninshield Coats. They produce some absolutely stunning coats, as well as some tank tops, skirts, and a belt (and have a new, very adorable puppy that was with them… yes, I ended up covered dog fur). Tess produces high-quality and functional(!) items, all patterns she’s designed and implemented. I mean, the range of arm motion in the Genevieve is just excellent! My husband and I were curious about how they got started, what were their stumbling blocks, etc. It was a good talk and gave us some insights on how to get started as a small fashion label.

We also went to the Museum at FIT, to see the current special exhibit, but I’ll write more about that later.

Posted in Duo80, Fashion | Leave a comment

Test Piece 4: gradations/short rows

I made my first pass at the 4th test piece last night. Even though I know better, I still forgot that yarn of the same weight can knit up differently when dyed different colors; it took me more tries to cast on properly and get the piece started with the black yarn than I’d like to admit.

Test Piece #4, first attempt.

I managed to drop a stitch in one of the black triangles and pick it up again without noticing (the hole you can see in the middle triangle, on the left). It’s also harder to see when I’ve dropped a stitch on the double bed, what with the fabric going between the beds. I had a much easier time noticing – and fixing – dropped stitches on my Brother KH-930, but I don’t have a ribber bed for it. I haven’t been able to successfully fix a dropped stitch that was done several rows back. When the machine occasionally misbehaves and drops some of the active stitches, I’ve done okay on getting those put back on the needles and maybe hooking up one or two rows back. I think it would be easier if I dropped the front bed and gave myself more room between the beds, but since this pattern also had five needles on the back bed in working position, I didn’t want to try doing that.

Test Piece #4, backside of first attempt.

This is a pretty terrible picture, but it shows one of the (several) mishaps that happened on the back side of the fabric. These all occurred at the last needle in a short row. From the extra yarn, it looks like it should be a loop of yarn like sometimes happens on the edge of a piece, but that doesn’t actually seem to be what it is. If I examine it closely, it appears that two needles didn’t grab the new yarn (but also didn’t lose the old loop) – sort of like the corresponding pushers were in the rest position (but they weren’t). It happened in three, maybe four, places.

Thinking about it some more, these are potentially spots where stitches were dropped and I had to get the loops back on the needle. I might have gotten the old loops on the needle without noticing that the new yarn was loose. That seems like a more logical explanation than the lock not actuating needles with their corresponding pusher in working position.

The instructions for this test piece were pretty spot on, so that was a nice change of pace. I think they’re still slightly off, but it didn’t cause me any trouble in executing their intent. I’ll keep a closer eye on them for my second attempt with this test piece.

Posted in Duo80 | Leave a comment

Test Piece 3

I think I really ought to steam these test pieces to see how they actually look. The third test piece also curls terribly and again required the use of Post-It pads to hold it flat-ish.

You may (or may not) see that the left arm I had a bit of trouble again with the increase. I missed the first row on four or so stitches in a row; mostly okay-ish otherwise. The right arm, though, is pretty awesome. The last increased stitch for the right arm is a bit stretched and funny looking, but I’m really happy with it overall.

The instructions, though, for the right shoulder and right shoulder-shaping – ridiculous. I think there might be an extra two rows for the right side (I’m not quite motivated enough to do a proper manual count and my notes aren’t good enough to say without counting).

The bind-off for the neck I did in black yarn because it was the yarn I had easily available for doing the bind-off. I dislike the sort of pull there is between the black-yarn-bound-off-edge and the neck/decreases shoulder area. I guess, to be fair, the instructions do say that you’re supposed to crochet an edge around the neckline once you’ve steamed the pieces and sewn the sides and arms together. I imagine that the crochet edge prevents the ugly (and potentially damaging to the garment) pulling between those two stitches.

I am definitely going to re-write the instructions for test pieces 2 and 3 in a way that doesn’t leave them so ambiguous.

Posted in Duo80 | Leave a comment

Passap Duo80 2nd Test Piece

Completed the second test piece from the Passap Duo80’s manual the other night. I’m not sure what 3 year old this would actually fit…

Completed 2nd Test Piece

It’s curling terribly (hence the post it pads holding it down), more than I would have expected.

The curl/bend from the ribbed hem to the main plain knit is odd. I don’t think I’ve ever seen that happen with hand knitting. My best guess is that it’s caused by the rib being done on both beds and the plain knit being single bed. Will have to ask other Passap knitters about this.

The wavy-ness within the plain knit body is fairly common to see in plain knitting done by continental hand knitters (differing stitch size between knits and purls); however, I didn’t expect to see it in something with mechanically-controlled tensioning. Potentially due to me stopping and starting in the middle of the project, pulling the yarn in the tensioner to correct it from pulling the lock too far past the end of the knitting.

I also had some difficulty with the +18 increases for the arms. That’s rather ragged and uneven since I wasn’t able to get those stitches to knit properly every time for the first few rows. (I had much better luck with the right arm on the 3rd test piece, the back to this “sweater.”)

I think some of the instructions in the manual leave a bit to be desired. I’m not sure if it’s due to translations or there’s some basic piece of knowledge I’m missing. I also wish it included stitch counts at the end of each section (minimally). I think I’m going to re-write the test piece instructions in a way that I think will be easier to understand, but that’s for another time.

Posted in Duo80 | 1 Comment